
The Amazing Circle
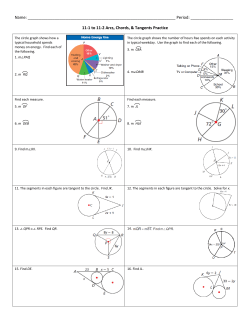
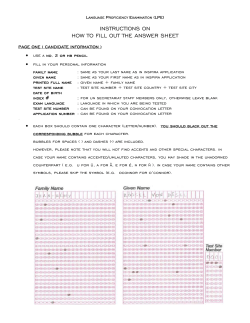
The Amazing Circle Grade Levels 3-5 CAMT Houston, Texas Dates: July 18- 21, 2012 Session Presenter: Lynn Carr Email: [email protected] Book Source All Around Circles Shapes, Solids and More Amazing Circle #1,#2,#3,#4 The Amazing Circle Circle Circus What's Next Volume 1 Visit: http://bit.ly/aimsconf Download the CAMT- CARR conference packet Handout will be available for download for two weeks. Standard duplication rights apply to activities received by conference participants. AIMS Education Foundation 1-888-733-2467 www.aimsedu.org facebook.com/aimsed twitter.com/aimsed Exploring the Amazing Circle Distribute the student page, Amazing Circle Number 1. 1 Fold the Amazing Circle in half and crease. a. What is this new shape called? [Semi-circular region] b. What is its straight edge called? [Diameter] c. In your own words, define a diameter. [the longest straight line segment with endpoints on the circle, a line segment through the center of the circle, etc.] d. What is the curved edge of this new shape called? [Semi-circle] e. How many semi-circles do you see? [Two] Relationship f. What part of the circular region lies within a semi-circular region? [One-half] Exploration g. Can you find a way to locate the center of the circle? [Fold a different semicircular region and crease. The center of the circle is where the two creases intersect.] Student Record h. Have the students label their Amazing Circles as shown in the diagram. Instruct them to color or shade one of the semi-circular regions. Once completed, tell them to tape their Amazing Circle to their student page. TEACHER GUIDELINES Identifications semi-circular region 1 of circular region 2 A AB is a diameter 1 of circular region 2 semi-circular region AMAZING CIRCLE, Vol. 1 B tape to student sheet at this position 4 © 2005 AIMS Education Foundation Name Class Amazing Circle Number Date 1 Cut out an Amazing Circle. Fold in half and crease. Identifications a. What is this new shape called? b. What is the straight edge called? c. In your own words, define a diameter. d. What is the curved edge of this new shape called? e. How many semi-circles do you see? Relationship f. What part of the circular region lies within a semi-circular region? Exploration ta pe he re g. How can you locate the center of the circle? h. Tape your Amazing Circle to the outlined circular region. AMAZING CIRCLE, Vol. 1 5 © 2005 AIMS Education Foundation Exploring the Amazing Circle Distribute the student page, Amazing Circle Number 2. 2 a Fold the Amazing Circle in half (a). Open the circle and fold a second, different semi-circle. Open the circle. Mark the point where the diameters intersect. a. What can you say about the two diameters? [They intersect at the center of the circle, bisect each other, are congruent, create four radii, form four central angles, create four sectors, etc.] b. What is the line segment equal to one-half a diameter called? [Radius ] c. The plural of radius is radii. How many radii do you see? [Four] d. The diameters cut the circle into parts. What are they called? [Arcs. In this instance they are shorter than a semi-circle and are therefore called minor arcs. Those greater than a semi-circle are called major arcs.] e. The two diameters created four regions. What are these called? [Sectors] f. What makes up the boundary of a sector? [Two radii and an arc] g. How many pairs of congruent sectors are there? [Two] h. How many non-overlapping angles have been formed at the center? [Four. These are known as central angles.] Relationships and Measurements i. How do the shapes and sizes of opposite sectors compare? [They are congruent: same size, same shape.] j. How does the measure of opposite angles compare? [The angles are congruent.] k. What is the sum of any two adjacent central angles? [180o or a straight angle] l. What shape do any two adjacent sectors form? [Semi-circular region] m. What is the sum of any two adjacent arcs? [Semi-circle] ADBE major arc Student Record DB minor arc n. Have the students label their Amazing Circles as shown in the diagram. Instruct them to color or shade one pair of opposite sectors. Once completed, have them tape their Amazing Circle to their page. 1 + 2 = 180˚ 4 AMAZING CIRCLE, Vol. 1 TEACHER GUIDELINES Identifications 6 tape to student sheet at this position © 2005 AIMS Education Foundation Name Class Amazing Circle Number a Date 2 Cut out an Amazing Circle. Fold the circle in half (a). Open the circle and fold a second, different semi-circle. Open the circle. Mark the point where the diameters intersect. Identifications b. What is the line segment equal to one-half a diameter called? a. What can you say about the two diameters? c. The plural of radius is radii. How many radii do you see? d. The diameters cut the circle into parts. What are those parts called? e. The two diameters created four regions. What are these called? f. g. How many pairs of of congruent sectors are there? What makes up the boundary of a sector? h. How many non-overlapping angles have been formed at the center? he re i. Relationships and Measurements How do the shapes and sizes of j. How does the measure of opposite opposite sectors compare? angles compare? l. ta pe k. What is the sum of any two adjacent central angles? What shape do any two adjacent sectors form? m. What is the sum of any two adjacent arcs? n. Tape your Amazing Circle to the outlined circular region. AMAZING CIRCLE, Vol. 1 7 © 2005 AIMS Education Foundation Exploring the Amazing Circle Distribute the student page, Amazing Circle Number 3. b a 3 Fold an Amazing Circle in half (a). Fold a second (b) and then a third semi-circular region. a. What can you say about the three diameters? [They all pass through the center of the circle, are congruent, create six sectors, six radii, six minor arcs, six central angles, etc.] b. What name is given to any line segment that passes through the center of the circle and has its endpoints on the circle. [Every such line segment must be a diameter.] Relationships and Measurements c. d. e. f. g. What shape do any three consecutive sectors form? [Semi-circular region] What do any three consecutive arcs form? [Semi-circle] What is the sum of any three consecutive central angles? [Straight angle, 180˚] How do opposite sectors compare? [They are congruent] How many pairs of opposite angles are there? [Three if the required condition is that they do not overlap. Students might label them and then use combinations of two angles and their opposite two angles to further explore this question.] h. How does the angle measure of opposite angles compare? [They are congruent.] TEACHER GUIDELINES Identifications Student Record i. Have the students label their Amazing Circles as shown in the diagram. Instruct them to color or shade opposite sectors. Once completed, have them tape their Amazing Circle to their page. AMAZING CIRCLE, Vol. 1 tape to student sheet at this position 8 © 2005 AIMS Education Foundation Name Class Amazing Circle Number b Date 3 Cut out an Amazing Circle. Fold the circle in half (a). Open the circle and fold a second (b) and then a third different semi-circular region. a Identifications b. What name is given to any line a. What can you say about the three diameters? segment that passes through the center of the circle and has its endpoints on the circle? Relationships and Measurements c. What shape do any three consecutive sectors form? d. What do any three consecutive arcs form? e. What is the sum of any three consecutive central angles? f. How do opposite sectors compare? h. How does the angle measure of opposite angles compare? ta pe he re g. How many pairs of opposite angles are there? i. Tape your Amazing Circle to the outlined circular region. AMAZING CIRCLE, Vol. 1 9 © 2005 AIMS Education Foundation Exploring the Amazing Circle Distribute the student page, Amazing Circle Number 4. a 4 b Identifications a. What is the straight line segment formed by the fold called? [A chord. All creases with endpoints on the circle are called chords of the circle. A diameter is a chord that passes through the center of the circle.] b. What constitutes the boundary of this new figure? [A chord and a major arc.] c. What constitutes the boundary of the part that has been folded? [A chord and a minor arc.] Student Record d. Have the students label their Amazing Circles as shown in the diagram. Instruct them to color or shade the shape bounded by the chord and the major arc. Once completed, have them tape their Amazing Circle to their page. TEACHER GUIDELINES Fold the Amazing Circle in half and crease (a). Fold a second and different diameter to locate the center of the circle. Open the circle (b). Bring one point on the circle to the center and fold, creating a sharp crease. tape to student sheet at this position AMAZING CIRCLE, Vol. 1 10 © 2005 AIMS Education Foundation Name Class Amazing Circle Number Date 4 b Cut out an Amazing Circle. Fold two diameters (a and b) to locate the center of the circle. Bring one point on the circle to the center and fold, creating a sharp crease. a Identifications a. What is the straight line segment formed by the fold called? b. What constitutes the boundary of this new figure? ta pe he re c. What constitutes the boundary of the folded over part? d. Tape your Amazing Circle to the outlined circular region. AMAZING CIRCLE, Vol. 1 11 © 2005 AIMS Education Foundation TM Thank you for your purchase! Please be sure to save a copy of this document to your local computer. This activity is copyrighted by the AIMS Education Foundation. All rights reserved. No part of this work may be reproduced or transmitted in any form or by any means—except as noted below. • A person or school purchasing this AIMS activity is hereby granted permission to make up to 200 copies of any portion of it, provided these copies will be used for educational purposes and only at one school site. • For a workshop or conference session, presenters may make one copy of any portion of a purchased activity for each participant, with a limit of five activities or up to one-third of a book, whichever is less. • All copies must bear the AIMS Education Foundation copyright information. • Modifications to AIMS pages (e.g., separating page elements for use on an interactive white board) are permitted only within the classroom or school for which they were purchased, or by presenters at conferences or workshops. Interactive white board files may not be uploaded to any third-party website or otherwise distributed. AIMS artwork and content may not be used on non-AIMS materials. AIMS users may purchase unlimited duplication rights for making more than 200 copies, for use at more than one school site, or for use on the Internet. Contact Duplication Rights or visit the AIMS website for complete details. P.O. Box 8120, Fresno, CA 93747 www.aimsedu.org • [email protected] • 1.888.733.2467 Topic Circumference Background Information Circumference is the distance around a circle. It is equivalent to the perimeter of a polygon, but it has its own name. Because circles are round, directly measuring circumference can be challenging. Many methods can be employed, and some work better than others, depending on the circle being measured. One method is to use a flexible measuring tape to directly measure the circle. This method works well when finding the circumference of jars or cans. Another method is to use a piece of string to go around the circle, then straighten the string and measure it using a ruler or meter stick. This works well with circles drawn on paper or paper plates. A third method that can be used when the circle is made from a flexible material (such as a rubber band or a loop of yarn) is to collapse the circle into a straight line, measure its length, and double it. Key Question What is the circumference of a circle and how can it be measured? Learning Goals Students will: • learn that circumference is the distance around a circle, and • practice various techniques for measuring the circumference of a circle. Guiding Document NCTM Standards 2000* • Describe attributes and parts of two- and threedimensional shapes • Relate ideas in geometry to ideas in number and measurement • Understand such attributes as length, area, weight, volume, and size of angle and select the appropriate type of unit for measuring each attribute • Understand how to measure using nonstandard and standard units • Use tools to measure Management 1. If you do not have a wind-up meter tape, you will need to tape several metric measuring tapes end to end so that you have 25-30 meters. 2. Gather a variety of circular or cylindrical objects like rubber bands, paper plates, grouping circles, cans, jars, lids, etc., in as many different sizes as possible to give multiple opportunities for finding circumference. 3. You need a large, open area either indoors or outdoors that will allow your entire class to stand in a line, holding hands, with their arms outstretched as far as they can. 4. For Part Two, set up a table with the string, meter sticks, and metric measuring tapes. Have enough of each so that several students can be using them at the same time. Math Geometry circles circumference Measurement Integrated Processes Observing Comparing and contrasting Relating Applying Procedure Part One 1. Ask students what geometry terms they have heard associated with circles. Record their responses on the board. If no on mentions it, write the word circumference. 2. Tell students that today they will be learning about circumference. Ask if anyone knows what the circumference of a circle is. 3. Discuss that the circumference is the distance around a circle. It’s the same as the perimeter of a square, rectangle, triangle, or other polygon, it just has a unique name that only applies to circles. Materials Wind-up meter tape, 30 m String Meter sticks Metric measuring tapes Assorted objects (see Management 2) Student page SHAPES, SOLIDS, AND MORE 181 © 2009 AIMS Education Foundation 4. Use the end of a can to trace a circle on the board. Challenge students to think about how they could measure the circumference of the circle you just drew. 5. After listening to some of their suggestions, tell students that they are going to try a few different ways to measure circumference. Take the class to the open area you have selected. Instruct them to stand in a circle holding hands. Have the students spread apart so that the circle is as large as it can be without letting go of their hands. (Students’ arms should all be fully extended.) 6. Ask students how they could measure the distance around the circle formed by their bodies—the circle’s circumference. Show them the wind-up meter tape. 7. Try all of the students’ ideas that are feasible and will result in an accurate measure of the circumference, being sure to include the following three methods: a. Use the meter tape to measure all the way around the circle. Since the tape is flexible, it can be used to directly measure the circumference. b. Turn the circumference into a straight line. Select two adjacent students to let go of their hands and begin to walk apart so that the circle becomes a straight line. Have students continue to keep their arms fully extended so that the distance remains the same. Use the wind-up meter tape to measure the length from the first student’s outstretched arm to the last student’s outstretched arm. c. Have the circle “fold in half.” Direct the students to walk toward each other until they are making a line, two people deep while still holding hands and keeping their arms outstretched. Measure the distance from one end of the line to the other, then double that distance to find the circumference. 8. Have students return to the classroom. Discuss the different methods used to find the circumference and how they compared. 4. Instruct students to trade objects and to repeat the process using a different method of finding the circumference. (Remind them to return the measuring tools to the table once they are finished so that others can use them.) 5. Repeat until all students have used at least three different methods for finding the circumference. 6. Discuss which method students prefer and why. Connecting Learning Part One 1. What is the circumference of a circle? [the distance around the circle] 2. What are some ways that circumference can be measured? 3. How did the different ways we measured the circumference of our “student circle” compare? Which do you think was easiest? …most difficult? Part Two 1. What methods did you use to find the circumferences of your circular objects? 2. How did the circumferences of your circles compare? [the bigger the circle, the larger the circumference] 3. Which method for finding the circumference did you like best? Why? 4. Do you think one method is more accurate than another? Justify your response. 5. What method would you use to find the circumference of a rubber band? Why? [It is difficult to measure around a rubber band with either string or a tape measure, so folding it in half and the doubling the length is likely the easiest way to find the circumference.] 6. When would you need to know the circumference of a circle? * Reprinted with permission from Principles and Standards for School Mathematics, 2000 by the National Council of Teachers of Mathematics. All rights reserved. Part Two 1. Explain that students are now going to have the opportunity to apply the same methods you used to find the circumference of their circle to their own circles. 2. Distribute a circular object and the student page to each student. Show students the table with the measuring tools that are available. Invite them to decide on one method for finding the circumference of the circle and to select the appropriate measuring tool(s) for this method. 3. Have them record their measurements on the student page along with the method used to find the circumference. SHAPES, SOLIDS, AND MORE 182 © 2009 AIMS Education Foundation Key Question What is the circumference of a circle and how can it be measured? Learning Goals • learn that circumference is the distance around a circle, and • practice various techniques for measuring the circumference of a circle. SHAPES, SOLIDS, AND MORE 183 © 2009 AIMS Education Foundation Describe each circle. Find its circumference. Tell how you found the circumference. Use a different way each time. My circle: _________________________ Circumference: __________ How I measured the circumference: ___________________________ ______________________________________________________________ My circle: _________________________ Circumference: __________ How I measured the circumference: ___________________________ ______________________________________________________________ My circle: _________________________ Circumference: __________ How I measured the circumference: ___________________________ ______________________________________________________________ My circle: _________________________ Circumference: __________ How I measured the circumference: ___________________________ ______________________________________________________________ SHAPES, SOLIDS, AND MORE 184 © 2009 AIMS Education Foundation Connecting Learning Part One 1. What is the circumference of a circle? 2. What are some ways that circumference can be measured? 3. How did the different ways we measured the circumference of our “student circle” compare? Which do you think was easiest? …most difficult? Part Two 1. What methods did you use to find the circumferences of your circular objects? SHAPES, SOLIDS, AND MORE 185 © 2009 AIMS Education Foundation Connecting Learning 2. How did the circumferences of your circles compare? 3. Which method for finding the circumference did you like best? Why? 4. Do you think one method is more accurate than another? Justify your response. 5. What method would you use to find the circumference of a rubber band? Why? 6. When would you need to know the circumference of a circle? SHAPES, SOLIDS, AND MORE 186 © 2009 AIMS Education Foundation TM Thank you for your purchase! Please be sure to save a copy of this document to your local computer. This activity is copyrighted by the AIMS Education Foundation. All rights reserved. No part of this work may be reproduced or transmitted in any form or by any means—except as noted below. • A person or school purchasing this AIMS activity is hereby granted permission to make up to 200 copies of any portion of it, provided these copies will be used for educational purposes and only at one school site. • For a workshop or conference session, presenters may make one copy of any portion of a purchased activity for each participant, with a limit of five activities or up to one-third of a book, whichever is less. • All copies must bear the AIMS Education Foundation copyright information. • Modifications to AIMS pages (e.g., separating page elements for use on an interactive white board) are permitted only within the classroom or school for which they were purchased, or by presenters at conferences or workshops. Interactive white board files may not be uploaded to any third-party website or otherwise distributed. AIMS artwork and content may not be used on non-AIMS materials. AIMS users may purchase unlimited duplication rights for making more than 200 copies, for use at more than one school site, or for use on the Internet. Contact Duplication Rights or visit the AIMS website for complete details. P.O. Box 8120, Fresno, CA 93747 www.aimsedu.org • [email protected] • 1.888.733.2467 Topic Geometry: properties and language Integrated Processes Observing Comparing and contrasting Relating Key Question How can a circle be transformed into another shape? Materials Scissors Rulers, optional Protractors, optional Set of 3-D models, for reference (optional) Focus Students will turn a paper circle into a truncated tetrahedron by a series of folding steps. They will observe the shapes made along the way—comparing the length and parallel/perpendicular relationships of sides, comparing angles, and comparing areas in terms of fractional parts. Background Information Geometry, with all its appeal to the visual and tactile senses, is also a language. The level of success in acquiring this language is heightened by using interesting contexts and encountering concepts repeatedly and over time. Amazing Circle, The Beginnings provides a way to determine progress in acquiring this geometric understanding and language. The big ideas of geometr y are shape and dimension. Attention is directed to shape with each fold that is made. Dimension comes into play as the two-dimensional circle is transformed into a threedimensional truncated tetrahedron. Other geometric concepts of importance in this activity are parallel/perpendicular relationships and congruence. Lines on a flat surface (in the same plane) that never intersect are called parallel lines. Perpendicular lines intersect at right angles. Geometric figures are congruent or equal if they have the same size and shape. Two line segments are congruent if they have the same length. Two angles are congruent if they have the same measure. Guiding Documents Project 2061 Benchmarks • Mathematical ideas can be represented concretely, graphically, and symbolically. • Many objects can be described in ter ms of simple plane figures and solids. Shapes can be compared in terms of concepts such as parallel and perpendicular, congruence and similarity, and symmetry. Symmetry can be found by reflection, turns, or slides. • Areas of irregular shapes can be found by dividing them into squares and triangles. NCTM Standards 2000* • Identify, compare, and analyze attributes of twoand three-dimensional geometric shapes and develop vocabulary to describe the attributes • Investigate, describe, and reason about the results of subdividing, combining, and transforming shapes • Explore congruence and similarity • Use geometric models to solve problems in other areas of mathematics, such as number and measurement Management This activity can be used as a culmination and review of geometric topics and language: 2-D shapes (both polygons and circles); one 3-D shape (a tetrahedron); the concepts of parallel, perpendicular, and congruence; angle measure; and area relationships expressed as fractions. Though the spontaneous and fun-loving aspect of the activity may be tempered, it can also be used as a more formal assessment. Students could record their answers to the questions on another piece of paper. It would be helpful to generate a word bank as a class to fend off frustrations with spelling, etc. Math Geometry and spatial sense 2-D and 3-D terminology Measurement, formal or informal length angle area (see Numeration) Numeration fractions as an expression of area relationships 1 © 2005 AIMS Education Foundation Procedure 1. Ask, “Have you ever tried origami, Japanese paper folding?” Explain that a square piece of paper is the beginning of most origami creations; but today, students will use a circle to do paper folding. 2. Give each student the circle and the two direction pages. Have students cut out the circle. 3. Proceed through the steps on the direction pages together. At each step, address the questions appropriate for your students and have them respond orally. 4. Enjoy the process and results while assessing the geometric knowledge and language the class has gained. 6. 7. Discussion (on direction pages) 1. Fold the circle in half. • What is the new shape called? [semi-circle] • What is the fold called? [diameter, line segment] • How does the area of the semi-circle compare to the area of the whole circle? [The semi-circle has one-half the area of the circle.] 2. Open the circle. Fold a second diameter. Mark the point where the diameters intersect. • Describe what you see. [Examples: The two diameters are equal length. Four radii extend from the center of the circle to the edge.] • How do opposite angles compare? [They are the same or congruent.] • How do you know? [One angle can be put over the top of another to directly compare. They can be measured with a protractor.] • Where will any two diameters always intersect? [in the center of the circle] 3. Open the circle and fold the edge to the center. • This fold is called a chord. It starts and ends on the circle but it does not pass through the center. 4. Make a second fold to the center so the two chords meet at one end. • What is the measure of the angle formed by the two chords? [60°] 5. Make a third fold to the center. It should meet the ends of the other two chords. • What is this shape called? [triangle] • Describe everything you notice about this triangle. [It has equal (congruent) sides and equal (congruent) angles. Each angle is 60° (acute), adding to a total of 180°.] • What kind of triangle is this? [equilateral triangle] 8. 9. 2 Find the midpoint of one side. Make a fold through this midpoint and the opposite vertex. • What kind of triangle is this? [right triangle] • What are the angle measures? [30°, 60°, and 90°] What is their sum? [180°] • How does the area of the right triangle compare to that of the equilateral triangle? [It is one-half the area of the equilateral triangle.] Open back to the equilateral triangle. Bring one vertex to the opposite midpoint and crease. • What is this shape called? [trapezoid, more specifically an isosceles trapezoid] • Describe its sides and angles. [Two opposite sides are parallel but one is twice as long as the other. The other opposite sides are equal (congruent) but not parallel. The two upper angles are congruent, obtuse, and 120°. The two lower angles are congruent, acute, and 60°.] • How many triangles fill the shape? [3] • How does the area of one of these triangles compare to the area of the trapezoid? [Its area is one-third the area of the trapezoid.] • How does the area of the trapezoid compare with the large equilateral triangle? [The area is three-fourths the area of the large triangle.] Fold the second and third vertices to the same midpoint. • What is this shape called? [rectangle] • How does the height of this rectangle compare with the height of the original triangle? [It is one-half as high.] • Notice that the vertices of the triangle are all together. What is the sum of these angles? [The sum is 180° and forms a straight angle.] Open to the trapezoid. Fold one of the outside triangles over the center triangle. • What shape is formed? [rhombus, also part of a larger group called parallelograms] • How do the sides and angles compare? [The sides are equal (congruent) and opposite angles are equal (congruent).] • How does its area compare to the area of the trapezoid? [Its area is two-thirds that of the trapezoid.] © 2005 AIMS Education Foundation 10. Fold the remaining triangle over the center triangle. • What is this shape called? [equilateral triangle] • How does its area compare with that of the rhombus? [It is one-half as large.] 11. Open to the original triangle. Fold the sides up into a three-dimensional pyramid. • What is another name for this shape? [tetrahedron] 12. Open to the original triangle. Fold one vertex to the center of the circle. • What shape is formed? [trapezoid, more specifically an isosceles trapezoid] 13. Fold another vertex to the center. • What is this shape called? [pentagon] • How do its sides compare? [Two sides are the same length and three others are shorter, but equal lengths. ] • How do its angles compare? [One of the five angles is different from the others. Or there are four obtuse angles and one acute angle. Or four angles are 120° and one angle is 60°.] 14. Fold the third vertex to the center. • What is the name of this shape? [hexagon, regular hexagon] • What can you say about its sides and angles? [The sides are equal (congruent) and so are the angles. The angles are all obtuse and measure 120°.] • How many small triangles do you see? [6 (unless students start counting all the smaller fold-line triangles)] • How does the area of the hexagon compare with that of the original triangle? [It is six-ninths or two-thirds as large.] 15. Open up to the original triangle. Tuck one of the small triangles at one vertex into the small triangle at another vertex. Tuck the remaining triangle underneath. • To which three-dimensional model is this shape related? [the tetrahedron or triangular pyramid (Explain that this is called a truncated tetrahedron. Truncated means it has a part that has been cut off.)] * Reprinted with permission from Principles and Standards for School Mathematics, 2000 by the National Council of Teachers of Mathematics. All rights reserved. 3 © 2005 AIMS Education Foundation Key Question How can a circle be transformed into another shape? Learning Goals • turn a paper circle into a truncated tetrahedron by a series of folding steps; and • observe the shapes made along the way—comparing the length and parallel/ perpendicular relationships of sides, comparing angles, and comparing areas in terms of fractional parts. 4 © 2005 AIMS Education Foundation Duplicate as many circles as required. Cut along the outside edge of the Amazing Circle so that the dark line of the circle is saved. 5 © 2005 AIMS Education Foundation 1. Fold the circle in half. What is the new shape called? What is the fold called? How does the area of the semi-circle compare to the area of the whole circle? 2. 3. Open the circle and fold the edge to the center. This fold is called a chord. It starts and ends on the circle but it does not pass through the center. 4. 5. 6. Open the circle. Fold a second diameter. Mark the point where the diameters intersect. Describe what you see. How do opposite angles compare? How do you know? Make a second fold to the center so the two chords meet at one end. What is the measure of the angle formed by the two chords? Make a third fold to the center. It should meet the ends of the other two chords. What is this shape called? Describe everything you notice about this triangle. What kind of triangle is this? Find the midpoint of one side. Make a fold through this midpoint and the opposite vertex. What kind of triangle is this? What are the angle measures? What is their sum? How does the area of the right triangle compare to that of the equilateral triangle? 7. 6 Open back to the equilateral triangle. Bring one vertex to the opposite midpoint and crease. What is this shape called? Describe its sides and angles. How many triangles ll the shape? How does the area of one of these triangles compare to the area of the trapezoid? How does the area of the trapezoid compare with the large equilateral triangle? © 2005 AIMS Education Foundation 8. Fold the second and third vertices to the same midpoint. What is this shape called? How does the height of this rectangle compare with the height of the original triangle? Notice that the vertices of the triangle are all together. What is the sum of these angles? 9. Open to the trapezoid. Fold one of the outside triangles over the center triangle. What shape is formed? How do the sides and angles compare? How does its area compare to the area of the trapezoid? 10. Fold the remaining triangle over the center triangle. What is this shape called? How does its area compare with that of the rhombus? 11. Open to the original triangle. Fold the sides up into a three-dimensional pyramid. What is another name for this shape? 12. Open to the original triangle. Fold one vertex to the center of the circle. What shape is formed? 13. Fold another vertex to the center. What is this shape called? How do its sides compare? How do its angles compare? 14. Fold the third vertex to the center. What is the name of this shape? What can you say about its sides and angles? How many small triangles do you see? How does the area of the hexagon compare with that of the original triangle? 15. Open up to the original triangle. Tuck one of the small triangles at one vertex into the small triangle at another vertex. Tuck the remaining triangle underneath. To which three-dimensional model is this shape related? 7 © 2005 AIMS Education Foundation TM Thank you for your purchase! Please be sure to save a copy of this document to your local computer. This activity is copyrighted by the AIMS Education Foundation. All rights reserved. No part of this work may be reproduced or transmitted in any form or by any means—except as noted below. • A person or school purchasing this AIMS activity is hereby granted permission to make up to 200 copies of any portion of it, provided these copies will be used for educational purposes and only at one school site. • For a workshop or conference session, presenters may make one copy of any portion of a purchased activity for each participant, with a limit of five activities or up to one-third of a book, whichever is less. • All copies must bear the AIMS Education Foundation copyright information. • Modifications to AIMS pages (e.g., separating page elements for use on an interactive white board) are permitted only within the classroom or school for which they were purchased, or by presenters at conferences or workshops. Interactive white board files may not be uploaded to any third-party website or otherwise distributed. AIMS artwork and content may not be used on non-AIMS materials. AIMS users may purchase unlimited duplication rights for making more than 200 copies, for use at more than one school site, or for use on the Internet. Contact Duplication Rights or visit the AIMS website for complete details. P.O. Box 8120, Fresno, CA 93747 www.aimsedu.org • [email protected] • 1.888.733.2467 CIRCLE CIRCUS Find the maximum number of interior regions created by 10 intersecting circles. First determine the maximum number of interior regions possible when fewer circles intersect. Look for the pattern that develops and use it to complete the table. 1 Circle Maximum Number of Maximum Number of Number of Number of Circles Circles Regions Regions 2 Circles 3 Circles 4 Circles 1 1 2 3 3 7 4 5 6 7 8 20 5 Circles WHAT’S NEXT? VOL. 1 n 34 © 2004 AIMS EDUCATION FOUNDATION SUM WILL, SUM WON’T (pg.32) CIRCLE CIRCUS (pg.34) Numberof Number ofDice Dice Smallest Smallest Possible Possible Sum Sum Largest Largest Possible Possible Sum Sum Sum(s) With Sum(s) With Greatest Greatest Chance of Chance of Occurring Occuring Occurring 2 2 12 3 3 4 4 5 5 6 Maximum Number of Maximum Number of Number of of Circles Circles Regions Regions 1 1 2 3 7 3 7 18 10 or 11 4 13 24 14 5 21 30 17 or 18 6 31 6 36 21 7 43 7 7 42 24 or 25 8 57 8 8 48 28 9 9 54 31 or 32 20 20 120 70 40 40 240 140 100 100 600 350 n (even) n 6n 7n 2 n (odd) n 6n 7n-1 7n+1 2 or 2 20 301 n nn --n+1 n+1 2 The first set of differences for the numbers in the second column is 2, 4, 6, 8, 10, etc. This pattern allows students to continue the table indefinitely. The horizontal solution is n(n-1) +1 = n2 - n + 1. To help students, suggest they subtract one from each number in the second column, obtaining 0, 2, 6, 12, 20, etc. TWENTY-ONE CONNECT (pg.35) THE END OF THE WORLD (pg.33) Number of Number Disks Disks Minimum Minimum Number Number of Moves Moves 1 1 2 3 3 7 4 15 5 31 64 2264-1- 1 n 22nn-1 -1 64 Extra Challenge Solution: 11 Approximately 5.85 x 10 = 585,000,000,000 years. Students will need a scientific calculator to solve the extra challenge. WHAT’S NEXT? VOL. 1 56 Students should count the number of segments for circles with 5 points and 6 points. To be sure all possible segments are drawn, have students examine how many originate from each point. This should always be one fewer than the number of points on the circle. Note that the differences for the numbers in the second column are 1, 2, 3, 4, 5, etc. This discovery allows students to continue the table indefinitely. If students are familiar with triangular numbers, they will recognize the numbers in the second column as triangular numbers. © 2004 AIMS EDUCATION FOUNDATION


© Copyright 2025