
Document 81187
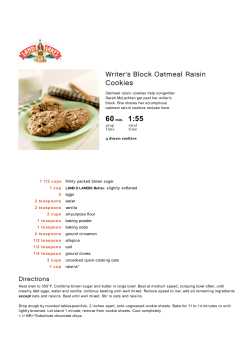
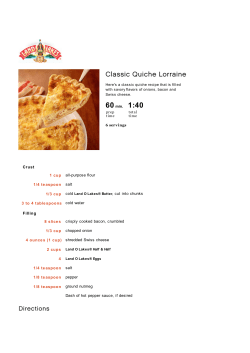
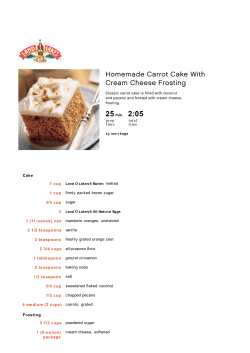
ZipList Recipe Plugin: Getting Started It’s easy to get started with the ZipList Recipe Plugin. Simply install the free WordPress plugin and then we’ll walk through how to use this helpful tool below. 1. Download the ZipList Recipe Plugin file and save it to your computer. 2. Log in to your WordPress admin dashboard. Scroll down to “Plugins,” then click “Add New.” 3. You’ll then reach the “Search” screen. Type in “ZipList Recipe Plugin” and click “Search Plugins.” 4. The first entry should be for the ZipList Recipe Plugin. Click the “Install Now” link. 5. When the “Plugin Installed Successfully” message appears, click “Activate Plugin.” You’re all set, so let’s get started with your first recipe post. How to Use the ZipList Recipe Plugin 1. Once you’ve installed the ZipList Recipe Plugin, click “Add New” under Posts on the left-‐hand navigation bar. When you’re on the “Add New Post” screen you’ll see an icon on the far right hand side of the styles row that looks like a spoon and fork. Click that button to start your first recipe post. Please note: each post can have only one Save Recipe Button – make sure each recipe is associated with a unique permalink. If a recipe requires sub-‐recipes, there is a special way to do this (it’s part of step 3 in these instructions). 2. An “Add a Recipe” box will pop up for you to enter or cut/paste the recipe title and image, as well as your ingredients and instructions. The recipe image should be entered as a URL (http://www.imageurl.com) 3. If you are adding a recipe that has a secondary recipe, maybe for a sauce or a glaze, pay special attention since there is a certain way you must add these ingredients so that they are properly added to a reader’s shopping list. Add ingredients for the main recipe, then start the next line with an exclamation point to create a label, like For the Sauce. Then, add the ingredients for the secondary recipe. 4. Next, if you scroll down, you can also click “More Options” to enter more details, like rating, prep time, cook time, serving size and yield. Click the “Add Recipe” button when you are done. 5. If you need to edit your recipe after you’ve clicked “Add Recipe,” simply click the spoon and fork icon again on the visual editor toolbar. Starting with plugin version 2.4, you will see an image like the one below where you enter post details, but again, to make edits to a recipe, click the spoon and fork icon on the toolbar. You can no longer edit or delete a recipe by clicking the placeholder image below. Also, note that with this change, you can no longer insert multiple ZipList-‐formatted recipes into one blog post. 6. Using the ZipList Recipe Plugin, here is what a recipe looks like on a blog. Even better, here’s what the recipe will look like in Google search results. * Just like the big recipe sites, such as AllRecipes.com and FoodNetwork.com, your recipes can also show up in the Rich Snippets format within Google Recipe Search with a photo, ingredients, cook time and ratings. Before we move on, I want to direct your attention to the blue “Save Recipe” button at the top of the recipe post. Its purpose is two-‐fold. One, it enables your readers to save your recipes to a central recipe box (always with a link back to your website for full recipe instructions). Two, it allows readers to easily save recipe ingredients to a master shopping list. When a reader clicks “Save Recipe,” here’s what he or she will see: *
Results in Google searches are based on a number of factors. Visit: https://support.google.com/webmasters/answer/173379#usage
Options include adding a tag, editing recipe ingredients, adding the ingredients to a shopping list, and more. If the reader chooses to go to her recipe box, a separate window or tab will open up with the ZipList Recipe Box. She’ll then find her new cookie recipe, including ingredients and a link back to your food blog or recipe site for preparation instructions. When a reader chooses to add recipe ingredients to his or her shopping list, they will be auto-‐categorized (e.g., produce, drinks, meats, etc.). But first, thanks to a built-‐in staples handling feature, ZipList double-‐checks to make sure the user doesn’t already have staples, like flour and sugar, in the pantry. See below. Once the reader has added the items to the list, she can then add any other items she needs to pick up at the store this week. Special Feature #1: Add Links within Ingredients or Instructions Adding a link is easy. Whether you want to link out to Amazon to let your readers purchase ingredients or kitchen equipment, or you want to provide links to related recipes. Now you can do this from within the Ingredients, Instructions and Summary fields. Here’s what you do: To add linked text, include both the word or phrase to be linked and the URL within brackets with a divider in between. Example, [ZipList|http://www.ziplist.com]. Here’s how Ingredients will appear in your actual blog post: Special Feature #2: Add Images within Recipe Instructions We know that many food bloggers like to incorporate images into their step-‐by-‐step recipe instructions (some also like to include images within their ingredients list). Now you can do the same with the ZipList Recipe Plugin. Here’s what you do: To add images between each recipe instruction, simply press enter after each instruction (very important). Then, add the image link preceded by a percentage sign. See example below. Here’s how images will appear between recipe instructions in your blog post. Special Feature #3: Add Labels within Recipe Instructions There are certain recipes that have a secondary recipe, like a salad and salad dressing. The ZipList Recipe Plugin now enables you to create labels to let readers know which steps are for which recipe. Simply enter your instructions for the main recipe, then start the next line with an exclamation point to create a label, like For the Salad Dressing. Then, add the instructions for the secondary recipe. Here’s what your recipe will look like when you post to your blog: Special Feature #4: Enhance Recipe Content with Bold and Italics The ZipList Recipe Plugin now makes it possible to bold or italicize words or phrases within the Ingredients, Instructions and Summary sections. Simply type in your recipe as you normally do, but for bold, enclose the word(s) in asterisks. For italics, enclose the word(s) in underscores. See example: Here’s what the Ingredients section of your recipe will look like when you post to your blog: Adjusting Your Settings 1. From your WordPress dashboard, scroll to the very bottom of the page and click ZipList Recipe Plugin on the left-‐hand side. 2. This will open a page called “ZipList Recipe Plugin Settings,” and from here you’ll be able to customize the output of your recipe plugin in several ways. Let’s take a look at each. If you choose to make any changes, be sure to click the blue “Save Changes” button at the bottom of the page when you are finished. Any changes you make here will be reflected across all recipes posted on your site using the ZipList Recipe Plugin. 3. The top field is for a Partner Key. This is not necessary to get started, but if you’d like for your logo and site name to show up alongside recipes in the recipe box (a link back to your site will be present regardless of whether you have a partner key), click the link that reads “Request a free partner key now.” You can begin using the plugin while you wait for the partner key; you will not lose any work. 4. The ZipList Recipe Box and Shopping List Buttons. If you keep this box unchecked, a “Save Recipe” button will appear on each recipe post. This enables your readers to save your recipes to a central recipe box (always with a link back to your website for full recipe instructions). From there, they can also add all necessary ingredients to a shopping list. Here is what the “Save Recipe” button looks like: 5. Custom Save Recipe Button. If you changed the look of the Save Recipe button (or plan to do so), you’ll need to enter the image URL for the custom button in the space provided. If you plan to use the blue Save Recipe button above, just leave this field blank. 6. Custom Print Button. If you changed the look of the Print button (or plan to do so), you’ll need to enter the image URL for the custom button in the space provided. If you plan to use standard Print text link, just leave this field blank. 7. ZipList Recipe Plugin Link. If you keep this box unchecked, a line will appear at the bottom of your recipe posts in light colored text that reads “Schema/Recipe SEO Data Markup by ZipList Recipe Plugin.” 8. Printed Output: Recipe Permalink. If you leave this box unchecked, the URL for the specific recipe post will appear at the very bottom of the print version of the recipe. 9. Printed Output: Copyright Statement. Here you have the opportunity to enter a copyright notice, the URL for your blog, or anything else you’d like to see appear at the bottom of the print version of your recipe posts. 10. In the General section, you’ll see Stylesheet. Only uncheck this box if you or a designer are working on a fully customized stylesheet to use with the recipe plugin (most plugin users will leave this box checked). 11. Recipe Title. If you leave this unchecked, you will see a title in the main body of your post. If you check the box, the black title to the left of the “Save Recipe” button below will disappear. The title will continue to appear on the print version of your recipes. 12. Print Button. If you leave this unchecked, you’ll see a “Print” button to the right of the blue Save Recipe button, enabling your readers to print out your recipe as a recipe card. 13. Image Width lets you set the appropriate size to match the width of your blog post. All of your recipe posts will size photos the same way based on this setting. 14. Image Display has two options. First, check the “Don’t show image in post” option box and the image will not appear in your blog post. It will appear when users save the recipe in their recipe boxes and will also be picked up by search engines like Google and Bing. Second, leave “Don’t show image in print view” checked and the recipe image will not appear when users go to print out your recipe. 15. Border Style. Here you have the opportunity to add a solid, dotted, dashed, thick solid or double black line around the entire recipe. The default is set to none if you do not wish to have any kind of border around your recipe. 16. Ingredients and Instructions. Here you have the option to change the label (e.g., if you prefer to refer to “Instructions” as “Directions”) or hide the label altogether by checking the “Don’t Show” boxes. Additional options include how the information is displayed: bulleted list, numbered list, etc. 17. In the Other Options section you’ll find options to change labels for rating, cook time, yield, notes and more. These are all optional so you don’t need to include any of them in your posts. However, if you want your posts to show up in Google Recipe Search in the Rich Snippets format, you will need to include at least two of the following fields: prep time, cook time, total time, calories, rating and/or image. Stylesheet Cookbook
A CSS style guide for the ZipList Recipe Plugin for WordPress
There are a variety of ways that bloggers can customize the output of the recipe plugin. Here’s a sampling of CSS
styles that you can drop into your Stylesheet. From the WordPress dashboard, go to “Appearance,” then “Editor,”
then “Stylesheet,” and add the ones you want to the very bottom of your stylesheet to personalize the appearance.
Add Bullets to Your Ingredients. Even if you select the “Bulleted” default for your Ingredients, you will not see
actual bullets unless you enter the code below to your stylesheet. We do this so that bloggers can feel free to add
their own custom bullets if they choose to do so.
#zlrecipe-container #zlrecipe-innerdiv #zlrecipe-ingredients-list li {
list-style-type: disc;
}
Remove the Indent on Ingredients. The everyday behavior of the plugin is to indent to the right all ingredients listed
under the Ingredients label. With this code below, the ingredients will indent just slightly (just enough to
accommodate a bullet if you choose to add bullets). See example below.
#zlrecipe-container ul {
padding-left: 0px;
}
Change the Color of the Recipe Title. The default recipe title color is black. However, if you want to change the
color of your recipe title, add this code to your stylesheet. The color code here, #4169E1, is just an example. You can
find a full list of color codes here: http://www.w3schools.com/cssref/css_colors.asp.
#zlrecipe-container #zlrecipe-title {
color: #4169E1;
}
Change the Size of the Recipe Title. The default size of the recipe title output by the plugin is 32 pixels. However,
you can make the title smaller by adding this code to your stylesheet, which makes the title only 24 pixels high. Feel
free to modify this number to adjust the size of the title to best suit your blog.
#zlrecipe-container #zlrecipe-title {
font-size: 24px;
}
Remove the Line Underneath the Recipe Title. The default plugin behavior is to add a black horizontal line just
below the recipe title. To remove this black line, add this code to your stylesheet.
#zlrecipe-container #zlrecipe-title.b-b,
#zlrecipe-container .item.b-b {
border: none;
}
Color the Line Underneath the Recipe Title. The default plugin behavior is to add a black horizontal line just below
the recipe title. To change the color of this line, add this code to your stylesheet. Change #DDDDDD to a color you
prefer. You can find a full list of color codes here: http://www.w3schools.com/cssref/css_colors.asp.
#zlrecipe-container #zlrecipe-title.b-b,
#zlrecipe-container .item.b-b {
border-color: #DDDDDD;
}
Color the Background of the Recipe Card. The standard background of the recipe card is white. However, if you
want to shade the background to make it stand out more on your blog, you can add this code to your stylesheet.
Using the code below will give your recipe card a light grey tint. You can find a full list of color codes here:
http://www.w3schools.com/cssref/css_colors.asp.
#zlrecipe-container {
background-color: #DDDDDD;
}
Color or Remove the Color Behind the Image. The standard behavior of the plugin is to add a light grey tint behind
the image. Use the codes below to either remove the color or change the color. You can find a full list of color codes
here: http://www.w3schools.com/cssref/css_colors.asp.
To remove the color behind the image
#zlrecipe-container #zlrecipe-innerdiv .img-desc-wrap {
background-color: transparent;
}
To change the color behind the image to white:
#zlrecipe-container #zlrecipe-innerdiv .img-desc-wrap {
background-color: #FFFFFF;
}
Move the “Save Recipe” Button to the Far Left When the Title is Not Displayed. If you choose not to display the
recipe title in the plugin and want to move the blue “Save Recipe” button from the far right to the far left, drop this
code into your stylesheet.
#zlrecipe-container .zl-recipe-link.fl-r {
float: left;
}
Add Padding to the Left of the “Save Recipe” Button. To add a few more spaces between the Save Recipe button
and your recipe title, add the code below to your stylesheet.
#zlrecipe-container .zl-recipe-link {
margin-left: 5px;
}
Change the Color of the Ingredients and Instructions Labels. The default ingredients and instructions labels are
black. However, if you want to change the color of these labels, add this code to your stylesheet. The color code
here, #4169E1, is just an example. You can find a full list of color codes here:
http://www.w3schools.com/cssref/css_colors.asp.
#zlrecipe-container #zlrecipe-ingredients,
#zlrecipe-container #zlrecipe-instructions {
color: #4169E1;
}
Change Line Spacing of Ingredients and Instructions. To add more spacing between ingredients and instructions,
add this code to your style sheet. You can adjust the 2.0 number to up or down to increase or decrease the amount
of space between each ingredient or instruction.
#zlrecipe-container #zlrecipe-ingredients-list,
#zlrecipe-container #zlrecipe-instructions-list {
line-height: 2.0em;
}
Set the Width of Images that Appear Within Instructions or Ingredients. To change the width of these images,
simply drop this code into your stylesheet. You can adjust the 300 pixel number up or down to make your images
more or less wide.
#zlrecipe-container .instruction-image,
#zlrecipe-container .ingredient-image {
width: 300px;
}
Change the Color Outline of the Recipe Card. If you choose to have a Border Style (e.g., solid, dashed, etc.) from
within the recipe plugin settings to create a recipe card look, you’ll find that the default outline color is black. If you
want to change the color of the outline, first you also need to set Border Style “none” in the plugin settings. Then
drop this code into your stylesheet. Replace width, style, and #DDDDDD with your preferences.
#zlrecipe-container-border
{ border: WIDTHpx, STYLE, #DDDDDD;
}
Thank you so much for your interest in the ZipList Recipe Plugin. If you have any questions or concerns, please send
an email to [email protected].


© Copyright 2025